프로세스를 종료 하였음에도 메모리가 정상해지 되지 않았거나 프로세스 엔트리에 남아 실행되고 있는 경우 이를 제거 하는 방법을 정리한다.
테스트서버 : Ubuntu22.04
작성일 : 2023-01-03
Zombie

On Unix operating systems, a zombie process or defunct process is a process that has completed execution but still has an entry in the process table, allowing the process that started it to read its exit status. In the term's colorful metaphor, the child process has died but has not yet been reaped.

When a process ends, all of the memory and resources associated with it are deallocated so they can be used by other processes. However, the process's entry in the process table remains. The parent is sent a SIGCHLD signal indicating that a child has died; the handler for this signal will typically execute the wait system call, which reads the exit status and removes the zombie. The zombie's process ID and entry in the process table can then be reused. However, if a parent ignores the SIGCHLD, the zombie will be left in the process table. In some situations this may be desirable, for example if the parent creates another child process it ensures that it will not be allocated the same process ID.
PRESS <ENTER> TO CONTINUE:
# 엔터로 계속
DO YOU ACCEPT THE TERMS OF THIS LICENSE AGREEMENT? (Y/N): y
# y + 엔터로 계속
===============================================================================
Choose Install Set
------------------

Please choose the Install Set to be installed by this installer.

  ->1- WebtoB
    2- Servlet + WebtoB

ENTER THE NUMBER FOR THE INSTALL SET, OR PRESS <ENTER> TO ACCEPT THE DEFAULT
   :
# 2 + 엔터
7> 설치폴더 입력
===============================================================================
Choose Install Folder
---------------------

Where would you like to install?

  Default Install Folder: /root/webtob

ENTER AN ABSOLUTE PATH, OR PRESS <ENTER> TO ACCEPT THE DEFAULT
      :
# /home/webtob + 엔터
8> JDK Path 입력
===============================================================================
Choose JDK Folder
-----------------

Please Choose a Folder:

Input User JDK Folder (DEFAULT: /usr):
아래 명령으로 JDK 1.6 설치
# oracle 에서 jdk 다운로드
sudo su
chmod +x jdk-6u45-linux-x64.bin
./jdk-6u45-linux-x64.bin
mkdir /home/env
mv jdk1.6.0_45 /home/env
9> 비밀번호 설정
===============================================================================
Password Input
--------------

Enter the Password for the administrator account. This password will be
registered in Servlet as the first user.

Input Password::

Corfirm Password::
10> 설치 확인
===============================================================================
Pre-Installation Summary
------------------------

Please Review the Following Before Continuing:

Product Name:
    WEBTOB4.1_SP9_Fix#1

Install Folder:
    /home/webtob

Install Set
    Servlet + WebtoB

Disk Space Information (for Installation Target):
    Required:  335,872,120 bytes
    Available: 23,808,159,744 bytes

PRESS <ENTER> TO CONTINUE:


===============================================================================
Ready To Install
----------------

Ready to install WEBTOB4.1_SP9_Fix#1 onto your system at the following
location:

   /home/webtob

PRESS <ENTER> TO INSTALL:


===============================================================================
Installing...
-------------

 [==================|==================|==================|==================]
 [------------------|------------------|------------------|------------------]


===============================================================================
Information
-----------

The administrator can set the maximum number of file descriptors as follows.
The machine needs a reboot in order for the configuration change to take
effect.

Linux 2.4 and later
-------------------
To check the current maximum number of file descriptors:
- Run "ulimit -Hn" on the command line.
This shows the hard limit.

To permanently change the maximum number of file descriptors:
- Open "/etc/security/limits.conf" with a text editor.
- Add a new line "*       hard      nofile     65536".
  65536 is the new maximum.  Change it as necessary.

PRESS <ENTER> TO CONTINUE:


===============================================================================
Install Complete
----------------

The installation of WEBTOB4.1_SP9_Fix#1 is complete, but some errors occurred
during the install.
   Please see the installation log for details.  Press "Done" to quit the
installer.

PRESS <ENTER> TO EXIT THE INSTALLER:
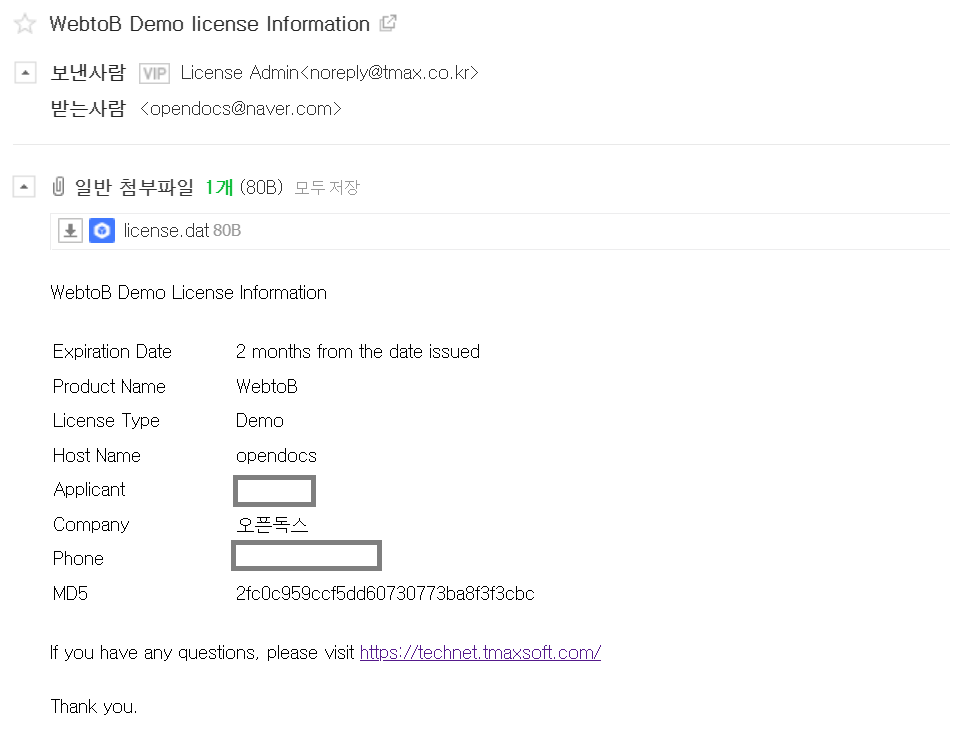
11> 라이센스 파일 복사
cp license.dat /home/webtob/license/
12> 환경변수 설정
sudo su
cd ~
vi .bashrc
# 아래내용 추가 후 저장
export WEBTOBDIR=/home/webtob
export PATH=$PATH:$WEBTOBDIR/bin
export PATH=$PATH:$WEBTOBDIR/lib
13> 환경파일 설정
vi ${WEBTOBDIR}/config/http.m
14> 환경파일 컴파일
cd ${WEBTOBDIR}/config
wscfl -i http.m
# jeus / webtob 모두 wscfl 파일이 있기 때문에 에러발생함
# 아래와 같이 실행해야함
${WEBTOBDIR}/bin/wscfl -i http.m
# 에러발생함 error while loading shared libraries: libwbiconv.so: cannot open shared object file: No such file or directory
# lib파일을 복사
cp ${WEBTOBDIR}/lib/libwbiconv.so /usr/lib/
# 다시실행
${WEBTOBDIR}/bin/wscfl -i http.m
PRESS <ENTER> TO CONTINUE:
# 엔터로 계속
DO YOU ACCEPT THE TERMS OF THIS LICENSE AGREEMENT? (Y/N): y
# y + 엔터로 계속
===============================================================================
Choose Platform
---------------

Choose the operating system and architecture :
1)HP-UX PA-RISC
2)HP-UX Itanium
3)Solaris UltraSPARC
4)Solaris x86
5)Solaris x64
6)AIX 5.x, 6.x, 7.x PowerPC
7)Linux Itanium
8)Linux x86
9)Linux x64
10)Linux PowerPC 64
Quit) Quit Installer

Choose Current System (DEFAULT: 9):
# 9 + 엔터
7> 설치폴더 입력
===============================================================================
Installation Folder
-------------------

Enter the installation folder.

  Default Install Folder: /root/jeus7

ENTER AN ABSOLUTE PATH, OR PRESS <ENTER> TO ACCEPT THE DEFAULT
      :
# /home/jeus + 엔터
8> 설치유형을 선택
===============================================================================
Installation type
-----------------

Please choose the Install Set to be installed by this installer.

  ->1- Domain Admin Server
    2- Managed Server

ENTER THE NUMBER FOR THE INSTALL SET, OR PRESS <ENTER> TO ACCEPT THE DEFAULT
   :
# 1 + 엔터
# Domain Admin Server : Domain Admin Server(DAS)와 Managed Server(MS)를 설치한다.
# Domain Admin Server는 Managed Server를 관리하기 위한 서버이다.
9> 설치모드를 선택
===============================================================================
Installation Mode
-----------------

* Production Mode
- Disables JEUS Hot Swap.
- Disables Automatic Reloading.
- Displays a warning message and recommends using a full license if a demo
license is used.

* Development Mode
- Enables JEUS Hot Swap.
- Enables Automatic Reloading.

  ->1- Production Mode
    2- Development Mode
    3- Cancel

ENTER THE NUMBER OF THE DESIRED CHOICE, OR PRESS <ENTER> TO ACCEPT THE
   DEFAULT:
# 2 + 엔터
# 여기서는 개발 & 테스트에 사용하기 위한 설치이므로 2번 선택
10> JDK Path 입력
===============================================================================
Enter the JDK path.
-------------------

Enter the JDK path:

Enter the JDK path (DEFAULT: /usr):
# /home/env/jdk1.6.0_45 + 엔터
※ JEUS7 버전의 경우 JDK 1.6 / JDK 1.7 만을 지원함
아래 명령으로 JDK 1.6 설치
# oracle 에서 jdk 다운로드
sudo su
chmod +x jdk-6u45-linux-x64.bin
./jdk-6u45-linux-x64.bin
mkdir /home/env
mv jdk1.6.0_45 /home/env
11> 추가 설정값은 기본으로 설정
===============================================================================
Password Input
--------------

Enter the Password for the administrator account.

Input Password::

--------------------------
 This is a Wrong Password
--------------------------
    Above 7 characters

    a ~ z  A ~ Z  0 ~ 9

Input Password::

Corfirm Password::


===============================================================================
User Domain name
----------------

Enter the Domain name

Enter the domain name (DEFAULT: jeus_domain):


===============================================================================
Node Manager
------------

select either ssh or java node manager

  ->1- java
    2- ssh
    3- Cancel

ENTER THE NUMBER OF THE DESIRED CHOICE, OR PRESS <ENTER> TO ACCEPT THE
   DEFAULT: 1
12> 설치 확인
===============================================================================
Pre-Installation Summary
------------------------

Review the Following Before Continuing:

Product Name:
    JEUS7.0

Install Folder:
    /home/jeus

Install Set
    Domain Admin Server

Disk Space Information (for Installation Target):
    Required:  748,536,230 bytes
    Available: 24,757,665,792 bytes

PRESS <ENTER> TO CONTINUE:


===============================================================================
Installing...
-------------

 [==================|==================|==================|==================]
 [------------------|------------------|------------------|------------------]


===============================================================================
Installation Complete
---------------------

JEUS7.0 has been successfully installed to:

     /home/jeus

PRESS <ENTER> TO EXIT THE INSTALLER:
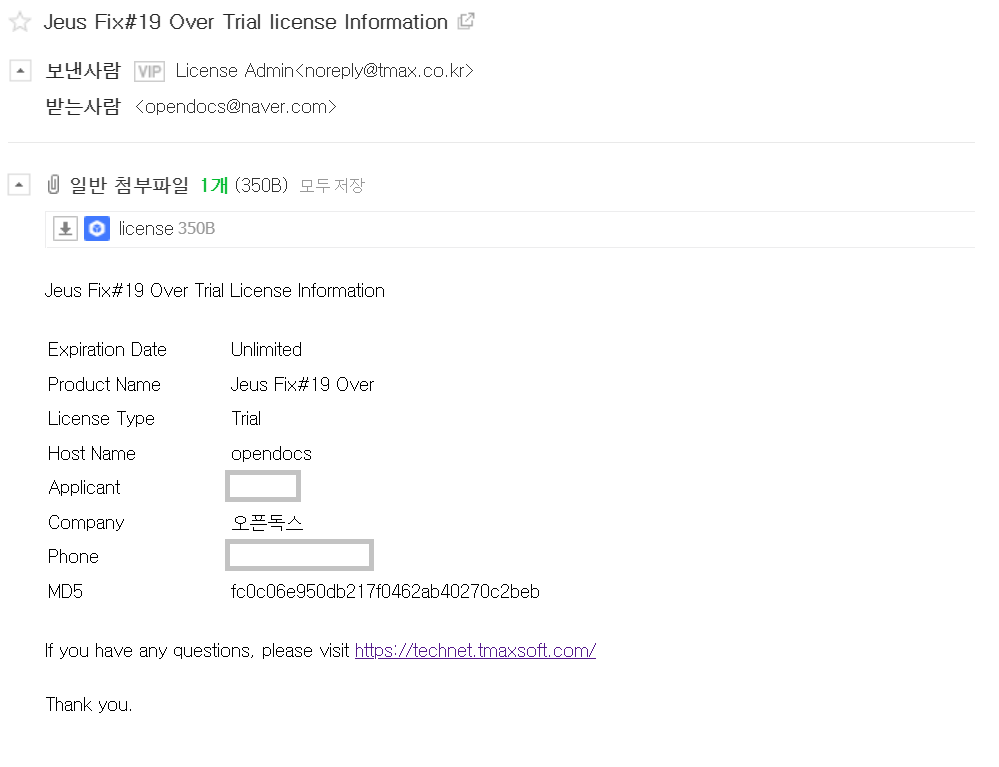
13> 라이센스 파일 복사
cp license /home/jeus/license/
14> 환경변수 설정
sudo su
cd ~
vi .bashrc
# 아래내용 추가 후 저장
export JEUS_HOME=/home/jeus
export PATH=$PATH:$JEUS_HOME/bin